Quilt Backings
Quilt backings seem to create so much confusion. I'm going to share a few of my observations and what I like. You or your quilter may differ ... this is my opinion only.
OK, here's one of mine that worked out very well with the pieced work on the front side. But it was just a happy coincidence. I tried, it's off but it still looks good.

Basically, I like backings to be about 8" wider and 8" longer than your top. If seaming 2 widths of fabric together, I love to load that outer selvage to my rollers and have the seam running parallel to my bars. 10" larger is OK, anything more than that is excess fabric that I have to deal with. Longer is OK (but you need to know which way I want to load that top!) but a lot of excess to the width looks like this as the quilt advances. I loaded this one with about 5" excess on one side and the rest on the other side. Otherwise I would have had to deal with this on both sides of the quilt.
It becomes a baggy, saggy mess as I advance the quilted quilt. It's thicker but the excess backing is just a single layer of fabric. Plus, it hinders my access on and off the quilt with my machine. I stuff batting scraps into that area as I advance but every extra step I take with your quilt takes more time. Time is money!
How do you know how I will load your quilt? I prefer to load the longest section to my leaders/roller. So if your quilt is 60 X 80. I try to load the 80" on the roller and the 60" is the length. But it does not always happen that way. If this is getting a directional panto, I have to load with the top of your quilt at the top roller. So you see, it's not so easy for you to know what I need. Also if you have pieced your backing with one seam, my preference is to have that seam parallel with my bar, so that may affect how I load your top. Or you have selvages on the outside edges of your fabric, I prefer to load that to the bar. Not a set system for me, I have to evaluate what you have given me to work with and how this will be quilted.
Which brings up piecing a backing. I prefer wide 1/2" seams, pressed open. What I do is leave the selvage on my fabric. Find a mark on my sewing machine and seam my fabric with a nice 1 1/2" wide seam. Then I use my rotary cutter and cut off that seam allowance leaving me about a 1/2" wide seam. Press flat, then press that seam open. The wide seam rolls on the bar better and does not bunch up. A 1/4" seam that bunches up shows on that backside. If you press that seam to one side, it really creates a bump. Here's an example of a backing that required several seams to get to the size needed with the fabric on hand.

Note where a bit of the selvage did find it's way into the seam allowance, I snipped through that tight weave so it would relax and play nice with the rest of the quilt.
Next, note how there is a bit of "sag" after loading on the frame in some of the pieced sections. This is due to the grain line I believe. But it always happens. Sometimes much greater than on this piece. We run the risk of getting puckers and tucks in those baggy saggy areas. The more pieced sections you insert in the backing, the greater the risk. Wide quilt backs are wonderful too! No piecing.

Let's talk about your quilt designs for the backside. You need to add that 4" on each side into your calculations. Ideally, you don't want a seam allowance on the back falling into your seam allowance for binding. It's very difficult for longarm quilters to center a design to hit seam lines on the front of the quilt. We can position the center top and bottom of the top and the backing, what happens elsewhere happens! A slight pull to the left or right of the backing can skew that placement line. If we try to center the MIDDLE (not center top but exact middle section of the quilt) of the quilt, baste back to the top then start quilting, I still get some movement and it's not going to hit those seam lines like you want (example you have a 4" border all around the backing that you want on the back side of your quilt). Close but not perfect.
Here is an example of one of my quilts. It just worked out that the pieces of fabric I had worked out to be the exact width of the body of the quilt and created border pieces that exactly matched my borders on the quilt. I did not plan it that way, I just used the fabric I had and that's how it ended up. I groaned and decided it would be a good example to see how accurate I could be with just a few simple marks to line up with. It came out nice, but not perfect!


One side matched up nicely, the other side was off.
I love "quilts" on the backside but keep in mind they do create more work for the quilter and I will guarantee it will NOT be perfectly centered if you are trying designs like the one above.
When adding pieced work, or inset strips of different colors, I prefer the look of having that inset be somewhere in the upper 1/3 of the quilt. Be sure to add the extra 4" in your calculations! Visually, if this is off 1" higher or lower than intended, it does not show. Don't forget to include the 4" in your side allowances as well.

Some of my favorite pieced backings are when you use a width of fabric in the center and add to each side. This makes a very pretty backing and it easy to center on the frame.

front of quilt and the backing


Let's talk about some of the issues I see frequently. The most common is that you did not send enough backing. Sometimes it is larger than the top, but not large enough to accommodate how I attach the top and bottom to the frame, or my clamps on the side. Some examples
Sides not wide enough to allow my machine bed to get near the sides without hitting my clamps or ruler and throwing my stitches off. One solution. I baste on "extenders". Every pass....

This is a 6" extra backing. I need approximately 1.5" to fasten with my Red Snappers, then there is only 1.5" excess to start/end your quilt. And my machine bed is hitting the fasteners. You want ruler work? To get the right angle on that ruler I can't get it to lay flat in that small area. If your grainline was off and I need to square up? I might be negative on one corner.
My preference is 8" longer and 8" wider. Longer is OK, just don't give me a yard more length. It's fabric I have to load that I'm not getting paid to deal with AND if I wanted to load the other direction.... I can't because of that excess fabric.
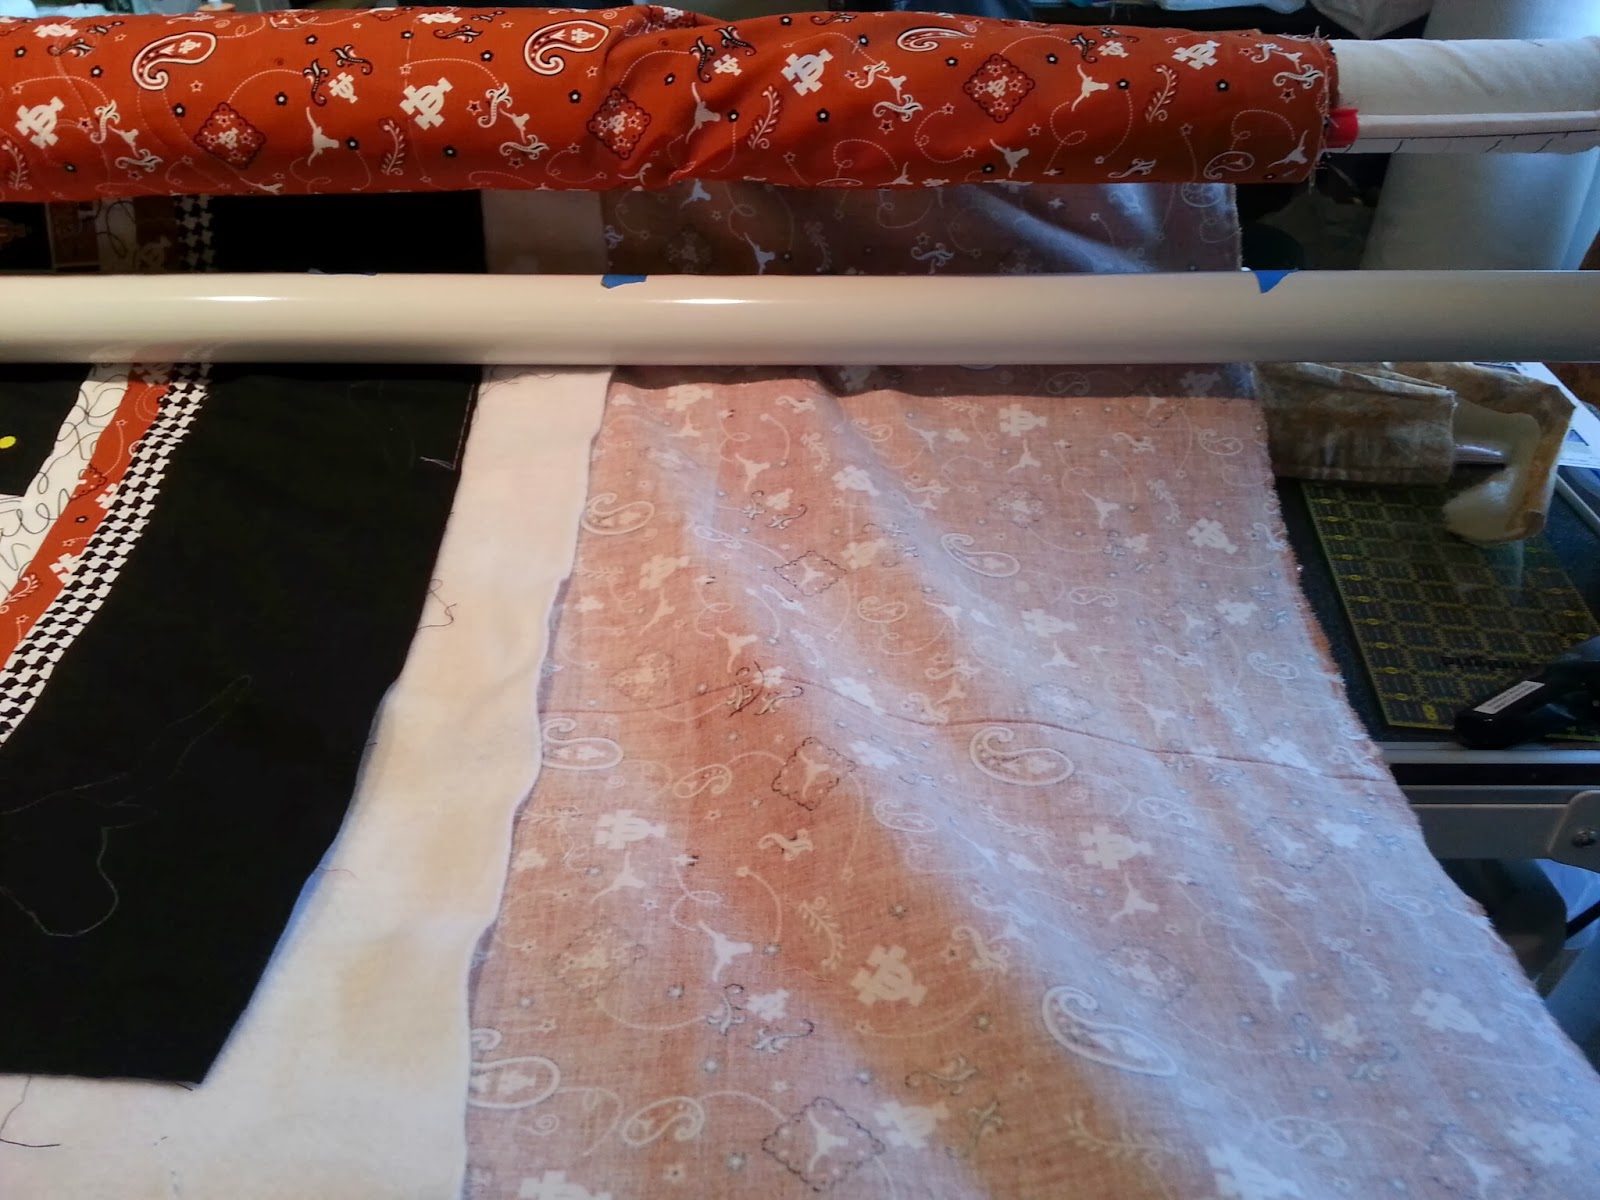
Another concern for potential puckers. I mentioned if one seam, I prefer to have that one parallel to the bars. If the seam(s) run vertical, you create bulk at the seam, then slack on each side of that seam. You can sort of get the idea from this picture.

One seam parallel to the bar distributes the fullness or slack areas equally, all on one pass. Instead of every pass the entire quilt increasing risks for puckers or tucks on the backside. The good news is: I really have not experienced tucks from these issues! Maybe once.
Lots of info, lots of scary stuff! But all manageable. 8" total wider and longer. Selvages removed from seams. I prefer wide seams pressed open when joining fabric sections. Selvage on the outside edge is a good thing. I like loading with that edge. Stay stitch seams on the outside edge just like you would your quilt top. That's not so bad... not so scary now is it!
Comments
Hugs, Ulla